Geoff's RUM Page
Filelist
Most Recent (use these!) 22FEB2010_COORD.bin 22FEB2010_ROUTER.bin 17FEB2010_html_pages.zip
Previous Versions 17feb2010_coord.bin 17feb2010_router.bin sam7x_coord_15feb2010.zip 20100216_sam7x_router_rumonly.bin
General Instructions - Router
- Program the .bin
- Connect a serial port to RS232 COM PORT @ 115200 Baud
- Reset the SAM7X to get the file running, should see some info come across the port
- Should see a message about a new node associated in the coordinator as well
- Ping the node’s IPv6 address, which you can find in the table on the coordinator or by pressing ‘i’ on the serial port of the ROUTER node. LED “DS2” will blink when the node receives a IPv6 echo request (ping) as well.
NOTE: The coordinator node must already be running & have been assigned global IPv6 addresses. If not the router node doesn’t pick up addresses properly.
Note: the serial port & telnet session present the same interface. If you telnet to the node, the serial port will be disabled. Hence the following instructions can be used over telnet or serial port:
Press ‘i’ to get a some info & menu. It will look like:
^short = 0x0001 parent = 0x0000 route= 0xFFFF channel = 24 PAN ID = 0xDEAD long = 0x0807060504030201 assoc = true rand = 0x1E part = RF231 version = 2
IPv6 Ethernet IF = :0 IPv6 6LOWPAN IF = 2001:470:b066:1:dcad:ff:fe00:1
802.15.4 Menu
================================ d…..Register Dump i…..Info dump X…..Max TX power c…..Set Chan p…..RUM Ping t…..Network Table R…..HTTP Server M…..Periodic HTTP Msg D…..One-time Message Ctrl-C…..Quit telnet^
===HTTP Server=== You can set the server a HTTPC message is sent to with by pressing ‘R’. The current server will be displayed, if you just press ‘Enter’ it will keep the current settings. To change it for example (bold text is your entry, (ENTER) means press the enter key):
M(ENTER) IPv6 Remote Server
[2001:5c0:1000:b::4bab]
: 20034(ENTER) Changed
===HTTP Message=== The HTTP message will be a TCP message with the following form:
GET /cgi-bin/put?%s HTTP/1.1\r\nHost: 1\r\n\r\n\r\n
Where %s is a specific string. There are two types of strings sent, either a periodic or a one-time string.
===Periodic Message=== The periodic message is sent every 30 seconds. To view or change the message, press ‘M’. You can then enter a message to send, entry is terminated by a a newline (enter key).
The message will replace a %T, %U, %I, or %O with a Temperature, Uptime in Seconds, RF Packets Received (IN), or RF Packets Transmitted (OUT) respectively. So for example the following would set the periodic message to send the temperature & Uptime:
M(ENTER) HTTPC Message
[T=%T]
: T=%T,U=%U(ENTER)
When the message is sent, it might be sent as ‘T=25.6,U=404’ for example.
===One-Time Message=== Sending a one-time message is done through the D command. To send a one-time message:
D(ENTER) One-Time HTTP Message: Hello World(ENTER)
This will send “Hello+World” as the string in the HTTP format. Hence a TCP message of “GET /cgi-bin/put?Hello+World HTTP/1.1\r\nHost: 1\r\n\r\n\r\n” will be sent.
You can also send a one-time message in a single line by putting the message after the ‘D’ command. The following is equivalent to the above, note a space is required after the D and is not considered part of the string:
D Hello World(ENTER)
General Instructions - Coordinator
- Program the .bin
- Connect a serial port to RS232 COM PORT @ 115200 Baud
- Reset the SAM7X to get the file running, should see some info come across the port
- Type ‘I’ (capital ‘i’) and hit enter, set your IPv4 address to something that works for your subnet
- Edit the ‘copy_all.bat’ file to point to your IPv4 address
- Run copy_all.bat to load the new webpages, wait for it to finish
- Point your browser to the board’ IPv4 address
IPv6 Note
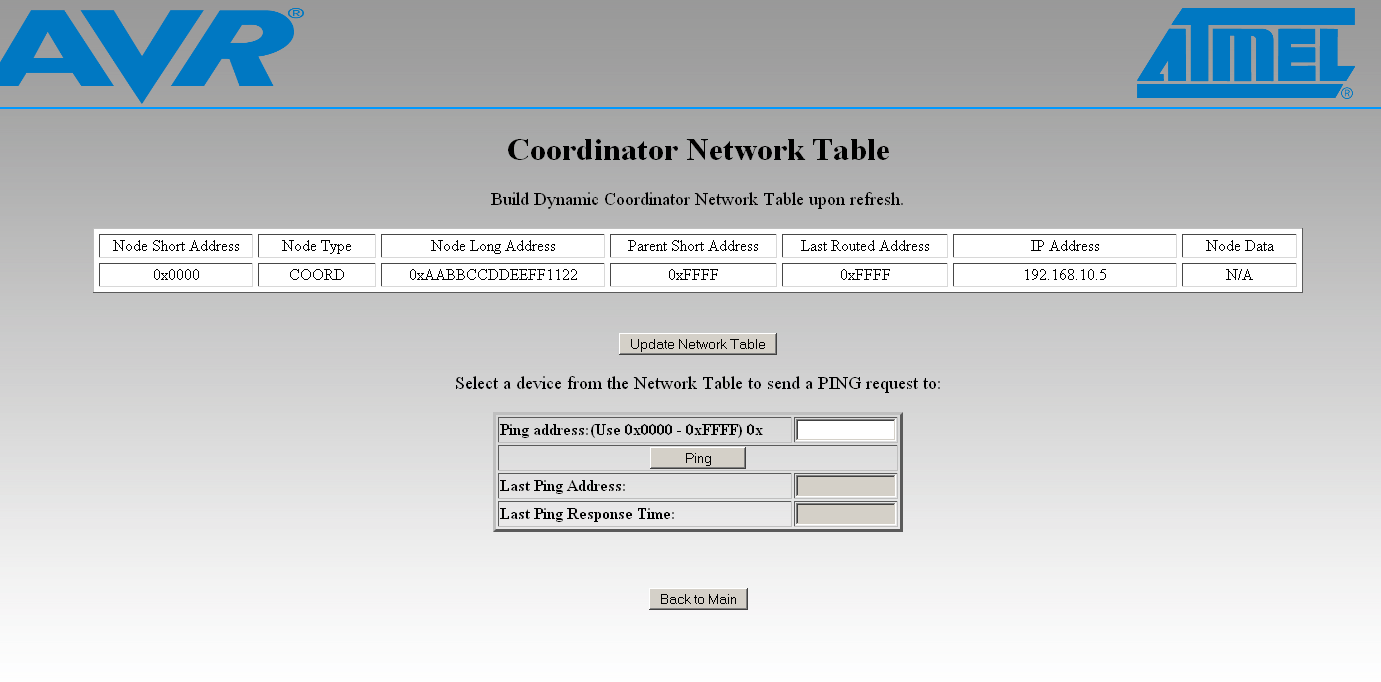
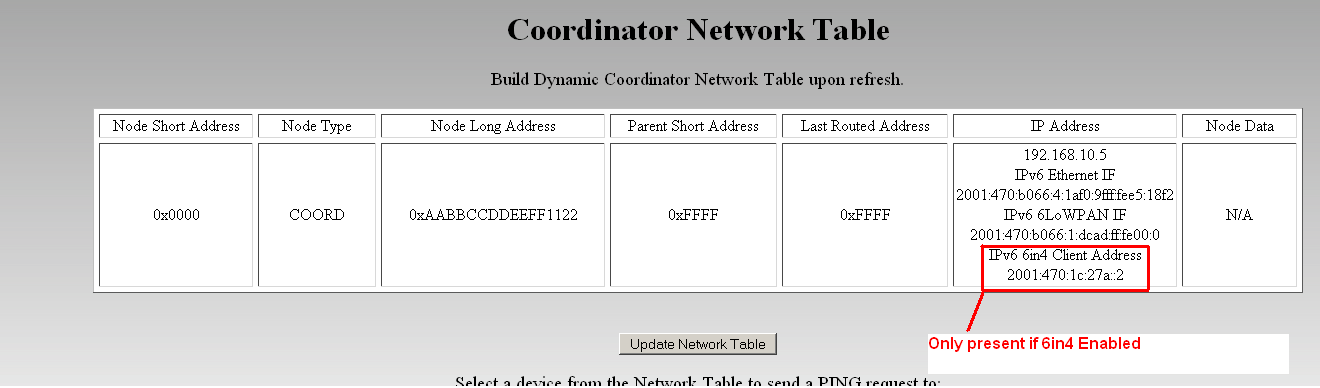
On every reset, the board takes 30-60 seconds or so to finish a number of IPv6 tasks. Until this is complete, the board will not function correctly for IPv6. The board is done when it has been assigned IPv6 addresses, which you can see from the second page.
A board which is NOT yet finished, will just have the IPv4 address:
A board which has finished, will have a number of addresses:
If you change any of the settings and hit “Save Settings” on the main page, this will cause the board to reset to load the new settings. Thus you must go check & wait until the IPv6 addresses become valid again.
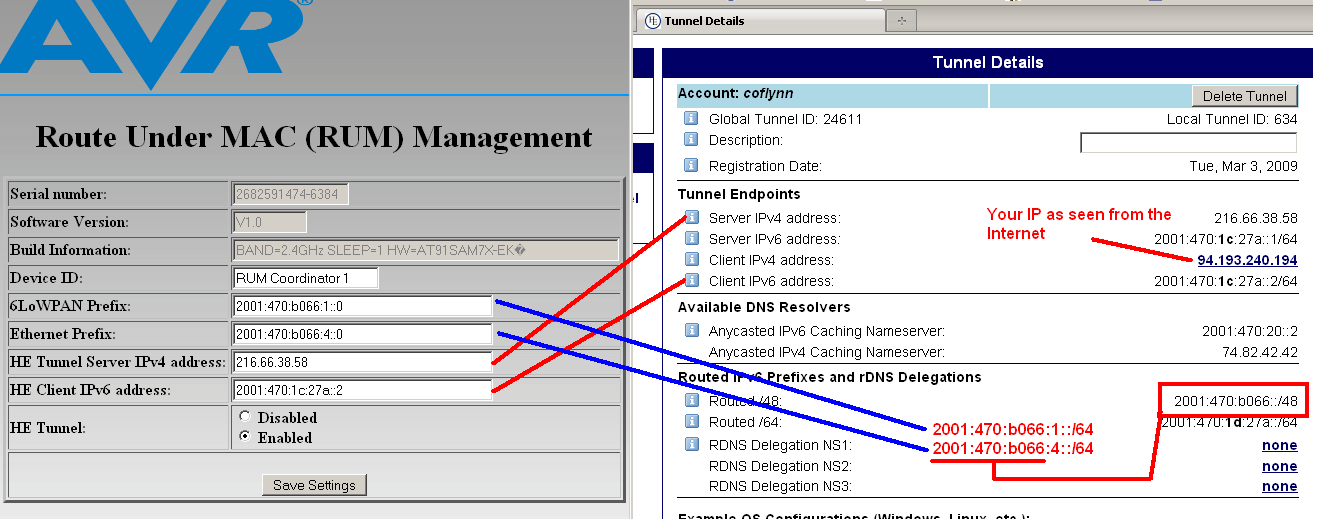
Using 6in4
- To use 6in4, you shouldn’t have another IPv6 router on the network to avoid another default route.
- Ensure you either have your NAT pass Proto41 traffic, or have exposed the SAM7X to the Internet through a DMZ
- If you put the radio button to ‘Enabled’, but the IPv6 in the router is not yet ready it will return to ‘Disabled’. Wait until the IPv6 addresses are valid and simply reload the page - it should then automatically switch to ‘Enabled’. Don’t keep trying to hit ‘Save Settings’, as doing that will make the SAM7X reboot, and again you’ll have to wait for IPv6 to be ready!
To debug, you should attempt the following:
- ping6 the Ethernet IPv6 address (in this example: 2001:470:b066:4:1af0:9fff:fee5:18f2)
- ping6 the 6LoWPAN IPv6 Address (in this example: 2001:470:b066:1:dcad:ff:fe00:0)
- ping6 the client tunnel endpoint IPv6 address (in this example: 2001:470:1c:27a2)
- ping6 the server tunnel endpoint IPv6 address. For HE this will be the same as the client tunnel endpoint IPv6 address, but with
::2 replaced with ::1. (in this example: 2001:470:1c:27a::1)
- ping6 ipv6.google.com
If step 1 works, but step 2 doesn’t, your computer is not using the SAM7X as the default route. You probably have another IPv6 router on the network or computer. Try adding the following routing rule:
^ip -6 route add <6lowpanprefix>/64 via
If steps 1 through 3 work but step 4 doesn’t, there is some problem with the tunnel. Check:
- Tunnel settings on the SAM7X
- Tunnel settings on your tunnel broker
- IPv4 gateway is set correctly on SAM7X
- SAM7X is exposed to the Internet, and any incoming packets on your global IP are passed to the SAM7X
- If the SAM7X is behind another router, it is performing NAT to ensure the 6in4 packets appear to be sent from the global IP